Hello all fellow stop motion lovers, Dan here with another update. I did this project around a year ago now, but it's nice to finally be able to talk about it.
I received an email from director / editor Nick Light asking if I would be interested in animating some green screen elements of cassette tape for a music video he was currently directing for the artist Mystro.
Once I said yes we had a good conversation discussing the amount of shots needed, how long each one will be, what the tape will be doing in that shot and the camera angles. With that understood it was time to start planning the shoot. I converted my basement into a small studio space. With the camera mostly shooting down. This would change if the shot need to be from a drastically different angle or required props to be animated on and around such as a table leg.
Now you would have thought that the hardest thing to get hold of was the cassette tape, but thanks to good old PoundLand that was sorted in no time. The hardest thing was to decide on was how it should be animated. In tests I found that the tape would move and completely change shape with the slightest touch, not good for animating with.
I did a number of test to stiffen up the tape trying sprays, glues, wire and animating in reverse. To an extent all these test worked, so it was decided on a shot by shot basis on which of these techniques would work best for it.
It was now time to start animating. Now as I was animating the elements on a green or blue screen it was important that I got the camera angle and direction of the tapes movements were correctly otherwise it would not match up in the edit. To do this I got a still shot from the live action video and using the chroma key tools on stop motion pro I lined up the camera to the image.
I shot the 11 3 to 10 second shots in around a week in between working full time. The only major problem I came across was the dreaded light flicker. After talking to the director about this it was decided not to worry as it only effected the background never the tape elements.
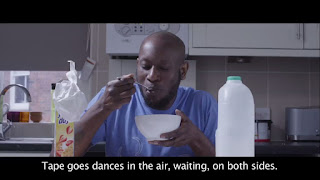
Here are the final green and blue screen elements. Light flicker and all. And here is the final music video. Hope you have enjoyed this latest post and as always your comments and feedback are very welcome.
Back in December of 2014 I received an
email from a musician friend of mine Kazuki James, check out his previous work here.
He was asking if I would be interested in doing an animated music video for
him. I of course said yes and Kaz went on to tell me that he has been working
on a cover track of Ed Sheeran’s Thinking Out Loud. Performing the music
himself while getting Birmingham based singer Andrew Morris to do the vocals,
check out his work here. Kaz went into more details explaining that he wants this
video to be a recreation the original music video.
If you have not seen the video check it out here.
The big difference in our video will be instead
of a man and woman ballroom dancing it will be two men. Myself and Kaz decided
that these two characters should be based on the singer Andrew and his husband
Drew. With the overall plan been that the finished video will be used to
promote same sex love and raise money for The Albert Kennedy Trustan LGBT charity.
The first thing I quickly realized when
given this project was that it would not be possible for me to build and make a
ball ballroom set in the time frame I had. To get around I decided to set the
video in a white paper textured environment with a wooden dance floor. Knowing this would not be very visually appealing
I got the idea that every time the dancing got more interment and loving the
paper walls will start peeling back. The big ending being a revealed montage of
all male couples, made up from friends of the singer and producer.
The Puppets:
With the story idea approved it was time
for me to start on the puppets. My plan was to build the armatures first. Knowing
I would have limited shooting space I did not want to make them too big.
Keeping in mind that these puppets will be to dancing men I gave them wide
shoulders, long arms with strong legs and feet. We were fortunate to get all
armature joints and parts kindly donated by AnimationToolkit.
With the armatures completed It was time
to start on sculpt the heads. As the two characters from this production are
based on real people I wanted to get a good likeness to them. I had Andrew the
singer send over some reference photos of himself and his husband.
Using these photos I did a quick concept
design on how I wanted them to look and started on sculpting the heads out of
Supper Sculpey. Once happy with the sculpts I baked the heads, drilled out the
eye sockets and stated on the paint jobs.
I stated off with a base coat of white
primer and carried on to apply layers of mutable shades of acrylic paint till I
was happy with the skin tone and texture. For the hair I wanted to do something
different with these puppets and gave them a real hair look and texture. To do
this I prepped the heads by painting on the hair and beard sections in a solid base
color, this will be used as a guide when I add on the hair.
To make the hair I got some cheap hair extensions,
cut them up into almost a powder. I then covered the painted sections on the
heads in PVA Glue. When tacky I sprinkled on the hair making sure to apply plenty.
Once dry I blew away the extra hair giving me the final look and I could not of
been happier with the final look.
As for the costumes myself and Kaz
wanted to base them on one of the reference photos were the two guys are at a
wedding dressed smart yet relaxed.
To make these costume pad out the armatures with sponge and trimming it down to a body shape I felt suited the guys.I then hand stitched
the trousers and waistcoat from scratch, however to save time the shirts are
from an Action-Man, with one died pink. Now you may have noticed that these
guys are a little more filled out then your standard Action-Man. To make these
fit I made a cut up each side of the shirts and hand stitched in an extra panel
of fabric.
The final step was using a sponge to apply
multiple layers of Liquid latex to build up the hands and feet. I used this
method as I I felt the solid colour you get from silicone would not match the
heads.
After popping in the eyes adding on the brows
and stick on mouths the puppets are completed and don’t they look Handsome!
The Set:
To make the set I took my animation
table from AnimationToolkit. I added the wooden floor by cutting up a printed plastic
pattern into floor board size strips and laid them onto set base. To make the background
it was simply 3 layers of paper: 1 brown parcel paper, 2 the montage of donated
photos and the final top layer of plane whit paper.
Let the Animating Begin!
My original brief was to make a shot for
shot remake of the original video. It became very clear that it would not be possible
to do the big romantic movements without this looking like a big joke. It was
very important to me and everyone else that this did not look overly comical, we
want this to look sweet, romantic with a hint of funny. I would plan out the dance routine in 10-20 second chunks of story-boarding, animating, story-boarding, and animating.
While
animating I found it was best to shoot on a mix of single and double frames. This
would depend on what the guys were doing and how big the dance move was in the shot.
However I would all ways shoot the wallpaper ripping on single frames.
It was important for me to try and find
ways of recreating moments from the original video, find ways to match the action
to the lyrics and focusing on not repeating myself. I found the best way to do
this was to edit the video as I went along adding the new shots in as soon as I
had finished animating them.
The Editing
Overall apart from exhaustion I felt the
only major Problem I came across while animating was the refreshing rate of the
LED lights causing light flicker. This would mostly happen with close-up shots
and when going from a mid-focused shot to an extreme close-up focusing on the pealing
walls. I was able to fix most of these shots in After Effects with lost cutting
up, Pasting, moving around masks and layers. However it was not possible for me
to fix every shot when the characters were moving over the flickering sections,
to try and fix these shots of would adjust the colour levels frame by frame.
The final edit was created on MAGIX
Movie Edit Pro 15, using the tools in the software I did the basic colour
correction, fades and added in all the camera moves. Once I was happy with the
cut it was time to export and get this Video Online.
Fun fact it took 4082 frames of animation make this video.
Check-out the final video here!
The Reaction
The critical reaction to this video has
been fantastic from people in and out of the LGBT community. This was amazing
to see that everybody’s hard work did indeed pay off and the subject is been
taken seriously.
I wanted to show you this one comment that
shows homophobia is still very reel and it's doing projects like this one that do make
a difference.
So come, comment, like, share with all your friends, help
spread the love and if you liked the video please donate to the The Albert Kennedy Trust !
 Once I said yes we had a good conversation discussing the amount of shots needed, how long each one will be, what the tape will be doing in that shot and the camera angles. With that understood it was time to start planning the shoot. I converted my basement into a small studio space. With the camera mostly shooting down. This would change if the shot need to be from a drastically different angle or required props to be animated on and around such as a table leg.